Since its release in 2005, Unity, a cross-platform game engine, has built a huge following. It supports more than twenty platforms (PCs, game consoles, mobile devices, internet apps), and the look and feel as well as modality have been a hit with everyone from indie developers to big, highly experienced teams. But what we’d like to do here is dive into a few of the more unusual technical problems you come across localizing projects in Unity just to make sure you never find yourself needing to redo one of them.
Fonts
Where do in-game texts start? Obviously, with a font.
Unity’s standard tool for working with fonts is the UI Text component. But in 2018 a new component was introduced: TextMesh Pro. And there’s no reason not to use it.
TextMesh Pro lets you work with fonts via Font Asset elements.
If you create a separate Font Asset for every language and copy that language’s characters into it, you’ll expand the build size and cut game performance. And since that’s not something your players will appreciate, you need to streamline the process. Happily, there is a simple solution: group your languages into Font Assets by writing system (Latin, Cyrillic, etc.), later combining those groups.
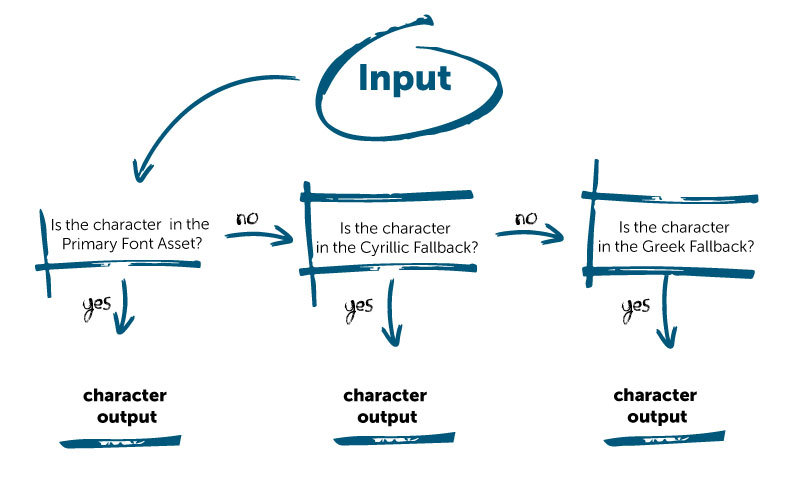
Let’s start by looking at languages with alphabetic scripts as an easy example.
We’ll create a Latin Font Asset and add all the characters from the extended ASCII set. Once that’s done, we can create another Font Asset for Cyrillic. The Cyrillic Font Asset should be attached to the Latin Font Asset as a fallback, which means it will be used if the game can’t find the right character in the main set. And since you can attach any number of fallback elements, all the European languages can fit in just a few Font Assets!
Here’s what the algorithm looks like when the game is looking for a character (during user input, for example):
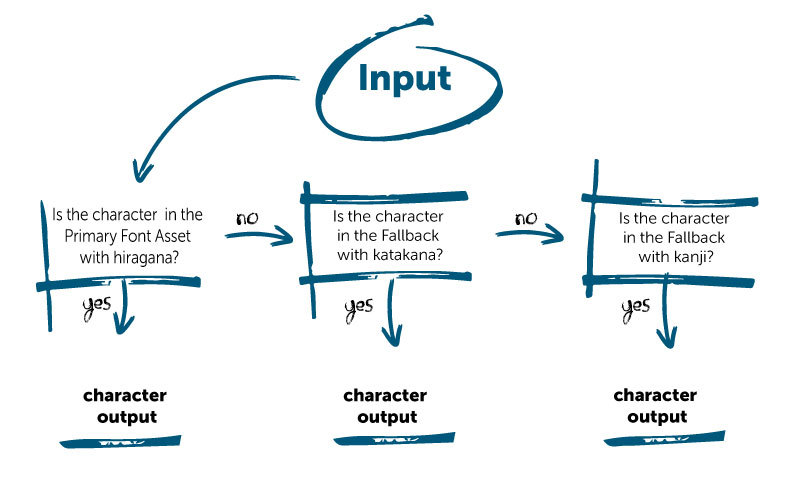
We’ll need a different strategy for languages with hieroglyphic scripts.
Here’s an example for Japanese:
- Create a Font Asset and import hiragana, the 46 unique characters that make up the main Japanese script.
- Create two more Font Assets, one for katakana (46 unique symbols mostly used to write words borrowed from other languages) and the other for kanji (2,136 Chinese characters used in Japanese).
- Attach the katakana and kanji Font Assets to the hiragana Font Asset as fallbacks.
This is how the search algorithm will look:
For simplified Chinese:
- Create a Font Asset and import all the characters used in in-game texts.
- Create a Font Asset for the characters in the first category of the Table of General Standard Chinese Characters (3,500 minus the ones in the primary Font Asset).
- Create a Font Asset for the characters in the second category (3,000 minus the ones in the primary Font Asset).
- Create a Font Asset for the characters in the third category (1,605 minus the ones in the primary Font Asset).
- Connect the Font Assets from steps 2–4 to the Font Asset from step 1.
Let’s visualize how the different character subsets relate to each other:
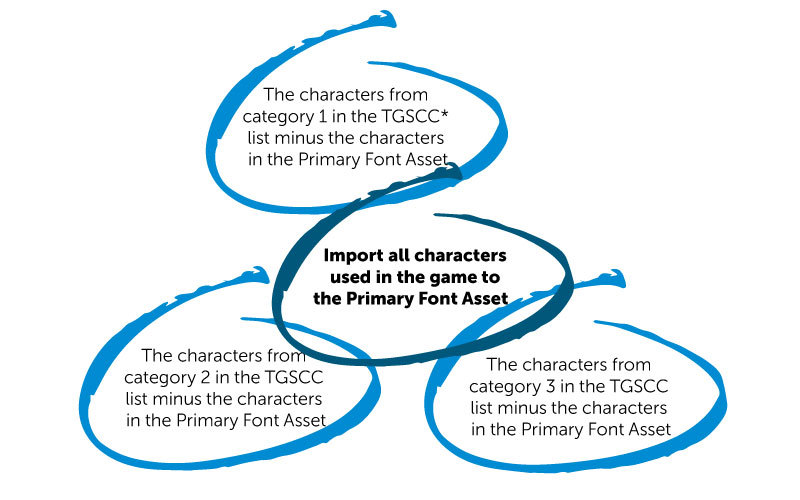
*Table of General Standard Chinese Characters
Sampling Point Size and Padding parameters
When you’re creating a Font Asset for a project (Font Asset Creator window -> Font Settings), note the Sampling Point Size parameter. That’s what determines how precisely each character of that font will be displayed on the screen. Without really getting into the technical details, we’ll just recommend choosing 72 points if your project uses texture atlases with a resolution of 2048 x 2048 (ideal for mobile games).
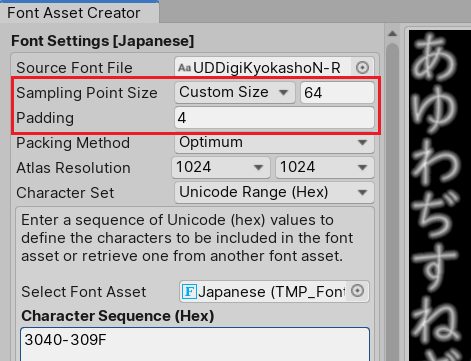
The Padding parameter is closely related to Sampling Point Size. It determines the number of text’s visual effects: the spacing between characters, shadow and brightness offset, the thickness of contours, and so on. We recommend selecting a Padding value that’s 7–10% of your Sampling Point Size. So if Sampling Point Size = 72, go for Padding = 6.
When you’re connecting a Font Asset to your main Font Asset as a fallback, make sure the ratio of Sampling Point Size to Padding in your fallback is the same as the ratio for the main Font Asset, otherwise the characters from different sets will be displayed differently.
For example, we went with a primary Font Asset ratio of Sampling Point Size / Padding = 72/6. That means our fallback element can have a ratio of Sampling Point Size / Padding = 48/4 or even 36/3.
You can learn more about creating Font Assets here.
Glossaries
Now that we’ve taken care of fonts, let’s move on to the meaning behind your in-game texts.
If you want players in Germany to understand what’s written on their screens, the original and the translation need to match up to each other. And those matches are compiled in separate text files that we in the localization business call glossaries. Information in glossaries is organized into pairs “key: value”. While keys are line IDs or even the original text, values are the translation into the relevant language.
Before you get to work, you need to answer an important question: how is your glossary going to be formatted? Unity supports about ten text file formats, though most localizers use one of five. Those are JSON, XML, YAML, CSV, and PO. Let’s take a closer look at the last two.
CSV
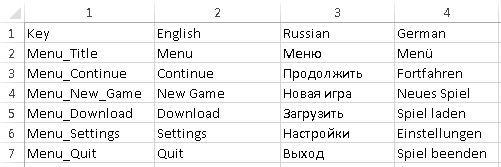
The simplest format for glossaries is CSV (Comma-Separated Values). Such files store data separated by commas or semicolons. Because the format is so universal, you can work with them using any spreadsheets or upload them to computer-assisted translation tools (memoQ, Trados, etc.).
Keep the keys in the first column, using the rest for values:
If your project doesn’t include tens of thousands of words, and you’re okay with crowdsourcing your localization, you can just go with Google Sheets. There’s a free plugin called Simple Localization that synchronizes Google Sheets and the text from your project.
Portable Object
Files using the human-readable PO (Portable Object) format follow the gettext standard, which is a library from the GNU internationalization project. What sets this particular library apart is that it uses the original lines in English rather than elaborate constructions as IDs. And that makes your job easier so long as in-game texts are written initially in English. Not only that, but the gettext library supports plurals. It’s hard to underestimate the value of this function when it comes to localization.
Every entry in PO files contains a connection between the original text fragment and its translation. As a rule, each PO file has just one translation language. Here’s how a standard PO entry looks like:
# translator’s comment
#. developer’s comment for translator
#: link to original program code
#, flag# | msgid previous line (in English)msgid original line (in English)
msgstr line translation
You can read more about PO files here.
The important element of localization is POT (Portable Object Template) files, which are the templates of PO files ready for translation. POT files are used to create new PO files in an editor as well as to update PO files when new translations are added. POT files have the same structure as PO files, but the line with translated text is empty.
You don’t have to add translated lines to PO files directly, instead update them using POT files. Of course, you’ll need a special text editor for that. The most popular choice for PO files is Poedit.
Here’s your plan of action:
- Create a PO file template as a POT file as well as the PO file itself (store it in the Resources/Languages folder).
- Attach the UILocalizeText.cs script to the text elements you need to localize to control updates.
- Set a value in your PO and POT files for UILocalizeText.cs.
- Initialize LanguageManager (use the DontDestroyOnLoad() method to make sure it isn’t deleted when new scenes are loaded).
- Use the LoadLanguage() call for language switch.
- Update in-game texts with the UpdateAllTextBoxes() call.
You can read more about localizing using PO files as well as the list of scripts here.
You’re now aware of some of the pitfalls that come with Unity, and that means you can avoid them.


